I'm here all summer doing a really fun show at a really fun amusement park, and in one of the numbers in our show we get to dress up as ice skating crayons. It's so funny! Nothing gets me quite like dancing inanimate objects do.
In honor of our silly kids' number, for opening day I decided to make friendship bracelets for all my cast mates in their corresponding crayon colors.
 Here's How You Do It:
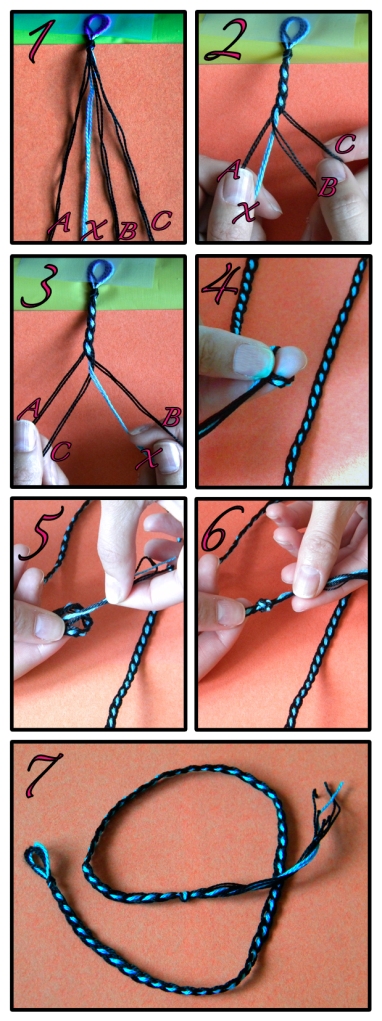
- Cut 3 strips of black embroidery floss and 1 strip of an alternate color to 40" each. Fold each individual strand in half then put them all together and tie them in a knot where you folded them, leaving a small loop for later. Tape the loop to the edge of a table and separate the strands into 4 sets of 2 as shown. For instructional purposes let's call the black strands A B and C and the alternate color stand will be X.
- Bring C over B and under X.
- Bring A under C and over X.
- Repeat steps 2 and 3 until you have braided the entire length of string. It helps me to say "over under, under over" while I'm doing the braiding. It also helps to hold all four strings in your hands at once, keeping them taut. Once you let a strand or two start dangling, it's harder to keep the braid straight and even. Now begin your knot by looping the braid around your finger.
- Pull the loose end through the loop.
- Pull the knot tight.
- You've made the bracelet! I made all of my bracelets up to this point and then wrapped them up in the paper that crayons are wrapped in and brought them to work. (The crayon paper was courtesy of my boyfriend, Justin, who is dressed up as the hunky orange crayon in the picture at the beginning of this post.) Once I had given them to everyone, I sized them to their wrists and added the finishing touches.
Here's how to size and finish the bracelets:
2. Tie a knot in the bracelet to mark the spot where you want it to end.
3. Cut off the original knot you tied at the end of the un-measured bracelet you made earlier.
4. Separate the contrasting colored strands from the black strands. (In this case, the contrasting colored strands are the light blue ones.)
5. Thread the contrasting colored strands through the holes of a small button.
6. Thread the same strands through the button holes again so they end up on the underbelly of the button.
7. Cut off all the excess strings so that they can only be seen beneath the button.
8. Put a dab of Mod Podge or other clear-drying glue on the end of the strings on the underside of the button so the knot won't come undone later.
9. Let it dry and you've now got a custom-sized grown-up bracelet for one of your friends!
Here's what a finished bracelet looks like:
Notice how the button that you attached to the end fits neatly through the loop that you made in the very first step when you started making the bracelet? If your loop is too big, your button will slip back out of the loop while you're wearing it and the bracelet will fall off. If you have that problem, just tie another knot next to the original knot at the base of the loop. It will make the loop smaller.
Aren't these bracelets so fun? They are basically just the same as the ones that I made when I was a kid, but the double-wrapping and the button add that little something extra that distinguishes the things we love as grownups from the things we loved as kids.
Until next time,
xoxo
Laura


Your blog just keeps getting better and better. And I have NO WORDS for Justin as a crayon.
ReplyDeleteThis is awesome!!! Thank you!
ReplyDeleteI was just at Cedar Point two days ago, and I saw this show. It was really great. I was just pinning, and I saw a pin that led me to this site. The crayon song is my favorite song from that show. Good job!
ReplyDeleteFun! Thank you! I'm really glad you liked it.
ReplyDelete[...] 9. Grownup friendship bracelets [...]
ReplyDeleteHow long should each embroidery strand be? And when you fold it in half, do you tie the loose eds in a knot? The second question was pretty complicated, so I'm mainly concerned on the first question :)
ReplyDeleteThis is great, I am going to save this tutorial for my daughter to have a go at over the summer holidays, perfect as I have lots of embroidery thread left over from my cross stitch days.
ReplyDeleteMica
Customer recommendations for Phoenix SEO Experts website