When I was looking around the internet for fun, patriotic DIY projects for my last blog post, I was really surprised that I didn't find anything about great hair accessories. I decided to remedy that by making a big, red, stripy bow and a tutorial to go along with it. Check it out:
I wanted to take the "no-sew" approach to this project, so I got some 1/4 inch thick Stitch Witchery iron-on fabric adhesive from Joann's. I also got a whole packet of big hair clips for $2 and a half yard of fabric, of which I only used a teensy bit for the bow.
Here's how to make it:

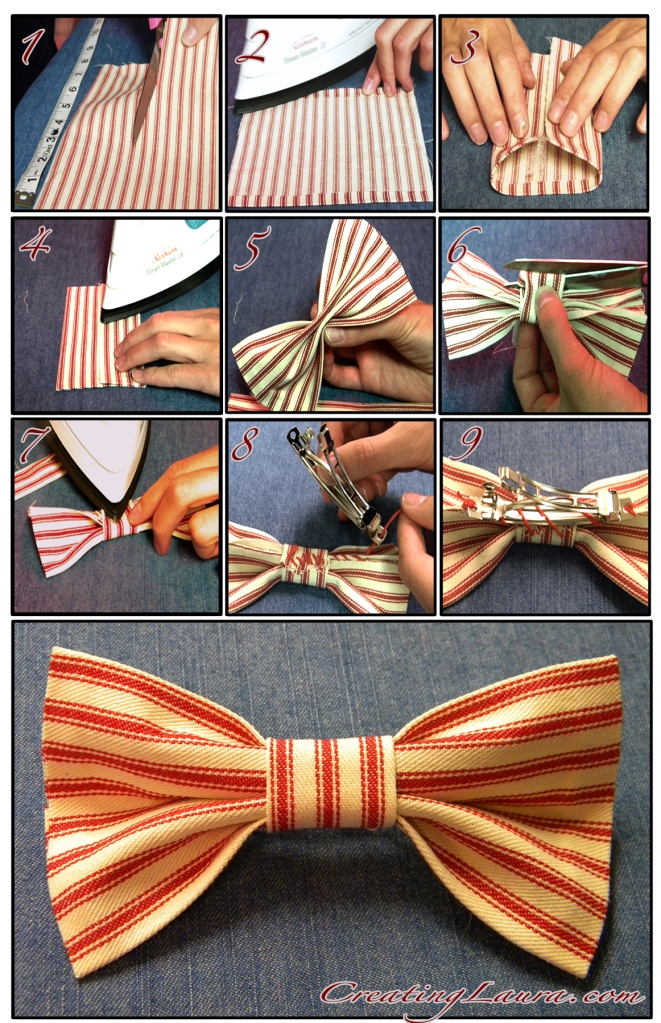
- Cut out a 5.5” x 6” piece of fabric so that the bow will be 5” x 3” when it's finished.
- With the front of the fabric facing down, find the 6” side of the rectangle and fold that edge over a quarter of an inch. Place a strip of fabric adhesive inside the fold and iron it down. The heat will activate the adhesive and make the fold permanent. Now repeat this step on the opposite edge, as shown.
- Fold the sides of the fabric together like french doors so that the 6” width becomes a 3” width.
- Put several strips of fabric adhesive inside the folds you’ve just made and iron it all together.
- Pick up your freshly-made 5” x 3” rectangle and pinch the middle of it between your fingers. It should look like a bow now.
- Cut out a 1.5” wide strip of fabric and fold it french door style like you did to the other fabric in step 3. Put some fabric adhesive inside the folds and iron it down to make a strip of fabric that’s 1 inch wide. Wrap this strip around the middle of the bow where you were pinching it with your fingers. Cut it so that it’s just long enough to overlap itself in the back of the bow.
- Add some fabric adhesive under the overlapped portion at the back of the bow and iron it down.
- In theory, you should now have a no-sew bow. I felt a little unsure about the strength of the fabric adhesive, however, so at this point I took a big needle and some embroidery thread and sewed down the middle strip on the back of the bow in order to make the whole thing extra-sturdy. I think it really helped, so I recommend doing it. Then I continued my stitches along the seam on the back of the bow and began to sew in the hair clip. While you are doing this, make sure that you only sew through the back part of the fabric so that your stitches don’t show on the front of the bow.
- Sew the rest of the clip onto the bow, and you’re all done. Turn it over and admire your work!
I’m really happy with the way my bow turned out, and I hope you are equally happy with yours if you make one too! I wore mine all day by the pool yesterday at our day-early 4th of July cast party, and it added the perfect amount of festive flair.
Enjoy your holiday!
xoxo
Laura


I was wondering if you could make a tutorial on how you made that bun? lol its so cute and I have no idea how you did it!
ReplyDeleteThanks, I'm glad you like it! There's a sock inside that bun, and you can find the tutorial for making it right here:
ReplyDeletehttp://creatinglaura.com/2012/05/14/sock-buns/
I think that this is a really professional looking bow!!
ReplyDeleteThanks so much for helping me to create a proffesional looking bow for my little sister. she cherishes it forever and it was a lot easier than ordering one off of etsy. thanks!
ReplyDelete